Sunday, 26 July 2020

How to build container storage in Azure storage account

If we want to build container storage, we have to create azure storage account first.
1) Create azure storage account


2) After creating storage account, go to this storage account and select " container" tab.

3) Give your container name and assign "Public access level" . In this case, I will show with "private (no anonymous access)  and Click "create".

4)

5) I will upload some file into this container as show below. Click "upload" and Browse your files that you want to upload to this container.

6) Before you upload, you can choose different option in "Advance" tab.
  • authentication type - you can authenticate with Azure AD user Account (or) Account Key
  • Block type - you can set block blog, page block, append block
  • Block Size -  you can choose any size in block size, max size is 100MB.
  • Access Tier -  HOT, COOL, ARCHIVE ( If you want to frequency access your data, you can set to hot tier but the price is more than other two )


7) select the file which you uploaded early , you will see overview , snapshots and generate SAS.
  • In Overview tab, you can see the URL Link of this file , create date, access tier and so on.
  • In Snapshot tab, you would see the snapshot if you created. 
  • Generate SAS,  shared access signature (SAS) is a URI that grants restricted access rights to Azure Storage resources (a specific blob in this case). You can provide a shared access signature to clients who should not be trusted with your storage account key but whom you wish to delegate access to certain storage account resources. By distributing a shared access signature URI to these clients, you grant them access to a resource for a specified period of time


8)
In SAS , you can assign start date and end date of SAS URL , allow ip address if you want to download your file to specific ip address. And also set allowed protocol HTTPS or HTTP. And finally you can generate SAS token and URL.
9)Click Generate SAS Token and URL and Copy SAS URL link into your browser. You will see that it will download your file from container because I used authentication type to  Access key in the previous step to access this file.


Here is the link you can see as video. https://youtu.be/pItqahpgD-Q
Hope for enjoy.
Phone Myint Myat Zaw
26/07/2020
7:07pm

Tuesday, 14 July 2020

How to Create Azure Storage Account

I already explain about azure storage introduction in this post (https://phonemyintmyatzaw7.blogspot.com/2020/07/azure-storage.html) and today I will show you how to create azure storage account step by step.
1)Go to azure portal and choose "storage accounts".

2) Click "Add" to create a new storage account.

3)
In subscription tab, you can choose your azure subscription type.
In resource group tab, you can create a new one or you can choose existing resource group.
In storage account name tab, you can assign your account storage name.
In Location tab, you can choose the location where your storage account will be placed.
In Preformance tab, you will see two option 'standard and premium'. Standard means Azure will keep your data by using magnetic disk drive. Premium means it will keep your data by using SSD Disk Drive. (you can see this information in https://phonemyintmyatzaw7.blogspot.com/2020/07/azure-storage.html ).
In Account kindsTab, you will see three option. 
  • StorageV2(General Purpose V2)
  • StorageV1 (General Purpose V1)
  • BlobStorage
General Purpose V2 Account က basic accountအမျိုးအစားဖြစ်ပြီး blobs,queues,filesနဲ့tablesတွေအတွက်သံုးနိုင်ပါတယ်
General Purpose v1 Account က legacy account အမျိုးအစားဖြစ်ပြီးသူလည်းပဲgeneral purpose v1 account လိုပဲသံုးနိုင်ပါတယ်ဖြစ်နိုင်ရင်ရင်တော့V2အစားV1ကိုသံုးစွဲစေချင်ပါတယ် မိမိကv1နဲ့blob storage account typeတွေသံုးထားတယ်ဆိုရင်တောင် v2 accountကိုdown time မရှိဘဲ data ကိုcopyကူးထားစရာမလိုဘဲတိုက်ရိုက်upgradeလုပ်ပြီးသံုးနိုင်ပါတယ်
Blob Storage account ကunstructured object data တွေကို block blob ဒါမှမဟုတ်append blobတွေအနေနဲ့သိမ်းချင်ရင်သံုးနိုင်တဲ့Special storage accountအမျိုးအစားဘဲဖြစ်ပါတယ် general purpose account နဲ့ blob storage accoutနဲ့နှိုင်းယှဉ်မယ်ဆိုရင်တော့Blob storage က latency consistent ဖြစ်ပြီး transaction rate ကပိုပြီးhigher ြဖစ်ပါတယ်

Replication Tab
  • Locally Redundant Storage(LRS)
  • Geo Redundant Storage (GRS)
  • Read Access Geo Redundant Storage (RA-GRS)

Replication က natural disaster ကြောင့်ဖြစ်စေ ကိုယ့်ရဲ့storage accountသိမ်းထားတဲ့data center ထဲက hardware failure မှုကြောင့်ဖြစ်စေကိုယ့်data တွေကိုမပျောက်ပျက်သွားအောင်data တွေက်ုတစ်ခြားတစ်နေရာမှာပွါးပြီးသိမ်းဆည်းပေးထားတာပဲဖြစ်တယ် Azure က မိမိstorage account မှာရှိတဲ့dataတွေကိုသက်ဆိုင်ရာ data center တွေမှာ default အနေနဲ့  copy ကို၃နေရာပွါးပြီးထိန်းသိမ်းပေးထားပါတယ်အဲလိုလုပ်ခြင်းကို Azure storage replication အမျိုးအစားတွေထဲကတစ်ခုဖြစ်တဲ့Locally redundant storage (LRS)လို့ခေါပါတယ် တစ်ခြား replication type တွေဖြစ်တဲ့ GRS (geo redundant storage) ကတော့regional outages တွေကိုကြောင့်data တွေဆံုးရှုံးမှုတွေကိုကာကွယ်ဖို့သံုးနိုင်ပါတယ် သူက primary regionထဲမှာပဲ data တွေကိုcopy ၃နေရာခွဲကူးပေးပြီး အဲဒီdata တွေကိုsecondary region တွေဆီကို synchronize ပြန်လုပ်ပြီး မိမိရဲ့data တွေကိုသိမ်းဆည်းပေးပါတယ်
In Access Tier Tab,
Access Tier ရဲ့လုပ်ဆောင်ချက်တွေကတော့ကိုယ့်storage account ထဲမှာရှိတဲ့blobထဲကdataတွေကိုဘယ်လိုမြန်မြန်ဆန်ဆန်နဲ့Accessလှမ်းလုပ်နိုင်မလဲဆိုပြီးဆံုးဖြတ်ပေးပါတယ် Access tier အမျိုးအစားကိုတော့ COOL နဲ့HOT ဆိုပြီးရွေးချယ်နိုင်ပါတယ် Access Tier မှာ coolကိုရွေးချယ်မယ်ဆိုရင် data access rate က hot ထက်ဆိုရင်တော့နှေးလိမ့်မယ် ဒါပေမယ့် cost ကတော့ သက်သာစေပါတယ် Hot ကတော့ data access rate ကမြန်ဆန်စေပြီး costကပိုများတာကိုတွေ့နိုင်ပါတယ်
I hope you will create you storage account in your environment more efficiently. 
Author By,
Phone Myint Myat Zaw
9:08PM 🔂
14/07/2020 🔄


Saturday, 11 July 2020

Introduction to Microsoft Azure Backup

Microsoft Azure Backup ကcloud based backup အမျိုးအစားဖြစ်ပြီးသူ့ရဲ့လုပ်ဆောင်ချက်က Cloud ပေါကVMတွေကိုသာမက on-premise က physical server တွေနဲ့ Hyper V တို့လို VMWare Infra ပေါမှာrunနေတဲ့ virtual machinesတွေကိုလည်း azure cloud ပေါကိုbackup လုပ်ပေးနိုင်ပါတယ် အခြားapplicationsတွေနဲ့databaseအမျိုးအစားတွေဖြစ်တဲ့SQL server တို့လိုMicrosoft Exchange Databaseကိုလည်းbackupလုပ်ပေးနိုင်ပါတယ်
Azure Backup ကိုသံုးခြင်းရဲ့အားသာချက်တွေကတော့ပံုမှန်သမရိုးကျbackup solution တွေdata recovery တွေလုပ်မယ်ဆိုရင် backup Infra တွေဆောက် backup servers တွေsetupလုပ်networking ပိုင်းတွေsetupလုပ်တာတွေကြောင့်လည်းငွေကြေးအားဖြင့်လည်ူကုန်ကျစရိတ်အရမ်းများပါတယ်တ စ်ချို့ကျပြန်တော့လည်းremote sitesတွေမှာbackupထားခြင်းကြောင့်လည်း Capital expenditures အရ သူ့အတွက်ကြိုတင်ရင်းနှီးမြှပ်နှံရတဲ့ငွေအင်အား အချိန်တွေလည်းအရမ်းပေးရပါတယ်
Azure Backup ကိုသံုးမယ်ဆိုရင်အဲလိုတွေစဉ်းစားစရာတွေမလိုဘဲ ကိုယ့်backup planကိုအချိန်တိုအတွင်းအကောင်ထည်ဖော်နိုင်ပြီး ကိုယ့်data တွေကိုcloud ပေါမှာsecure ြဖစ်အောင်ထိန်းသိိမ်းနိုင်ပါတယ်
Azure Backup ကိုအသံုးပြုရာမှာလည်းအရမ်းကိုလွယ်ကူရိုးရှင်းပါတယ် Azure Portalကနေအလွယ်တကူconfigure လုပ်နိုင်ပါတယ် Azure Backupမှာအဓိကအရေးပါတဲ့အစိတ်အပိုင်းကAzure Recovery Service Vault ဘဲဖြစ်ပါတယ် မိမိတို့ရဲ့dataတွေကို Azure က AZ recovery service vault ထဲမှာသိမ်းဆည်းထားပေးလို့ဘဲဖြစ်ပါတယ် Azure Recovery service vaultအကြောင်းလေးနည်းနည်းလောက်ဆွေးနွေးချင်ပါတယ် AZ recovery services vaultကbackup dataတွေကိုstoreလုပ်ထားတဲ့နေရာတစ်ခုပဲဖြစ်ပါတယ် 🌄🌋အဲဒီbackup dataတွေထဲမှာfile and folder level backup တွေapplication database backup dataတွေ Azure IAAS VM backup တွေအားလံုးပါဝင်ပါတယ်
Microsoft Azure Backup မှာအဓိက လုပ်ဆောင်ပေးမယ့်အစိတ်အပိုင်းတစ်ခုကတော့ Backup agents တွေဘဲဖြစ်ပါတယ်
Backup agent အမျိုးအစားကသံုးမယ့်backup အမျိုးအစားပေါမူတည်ပြီးကွဲပြားမှုရှိပါတယ် ဥပမာ ကိုယ်backup လုပ်ချင်တဲ့ အမျိုးအစားက file and folder level backupလား virtual machine တစ်ခုလံုးကိုလား အဲလိုv1 တစ်ခုလံုးကိုမှ cloud ပေါကလား hyper v ပေါကလား VMWare ပေါကလားအစရှိသည်ဖြင့်ကိုယ်အသံုးပြုရမယ့်backup typeပေါမူတည်ပြီး သံုးသွားတဲ့ backup agentsအမျိုးအစားကအမျိုးမျိုးရှိပါတယ်
1) Azure Backup Extension ကdefault backup agent အမျိုးအစားတစ်ခုဘဲဖြစ်ပါတယ်သူ့ကိုတော့ Azure ပေါက Azure virtual machine တွေကိုတိုက်ရိုက်backup လုပ်တဲ့နေရာမှာသံုးပါတယ် သူက backup လုပ်ချင်တဲ့Azure virtual machine မှုbackup agent ကို manual install လုပ်စရာမ လိုပါဘူး Azure
Recovery service vaultထဲမှာbackup လုပ်ချင်တဲ့Virtual machine ကိုbackup jobs run ပြီးတာနဲ့ (ဥပမာ window virtual machine ဒါမှမဟုတ် Linux virtual machine ) ကို backup ယူလိုက်တာနဲ့ VM Snapshot extension ကိုသက်ဆိုင်ရာ virtual machine ပေါမှာ install လုပ်လိုက်ပါတယ် အဲလို virtual machine ရဲ့ disk တစ်ခုလံုးကို  snapshot ရိုက်ပြီး data တွေကို azure recovery vault ထဲမှာသိမ်းဆည်းထားပါတယ်


Thursday, 9 July 2020

How to Export Office365 Exchange Online Moblie User List into excel CSV Format


Copy this pink colour script into notepad and save as "all file" types and give file name to MobileUser.ps1.
$credentials = Get-Credential -Credential youremailaddress
    Write-Output "Getting the Exchange Online cmdlets"

    $session = New-PSSession -ConnectionUri https://outlook.office365.com/powershell-liveid/ `
        -ConfigurationName Microsoft.Exchange -Credential $credentials `
        -Authentication Basic -AllowRedirection
    Import-PSSession $session

$csv = "C:\TEMP\MobileDevices.csv"
$results = @()
$mailboxUsers = get-mailbox -resultsize unlimited
$mobileDevice = @()

foreach($user in $mailboxUsers)
{
$UPN = $user.UserPrincipalName
$displayName = $user.DisplayName

$mobileDevices = Get-MobileDevice -Mailbox $UPN
       
      foreach($mobileDevice in $mobileDevices)
      {
          Write-Output "Getting info about a device for $displayName"
          $properties = @{
          Name = $user.name
          UPN = $UPN
          DisplayName = $displayName
          FriendlyName = $mobileDevice.FriendlyName
          ClientType = $mobileDevice.ClientType
          ClientVersion = $mobileDevice.ClientVersion
          DeviceId = $mobileDevice.DeviceId
          DeviceMobileOperator = $mobileDevice.DeviceMobileOperator
          DeviceModel = $mobileDevice.DeviceModel
          DeviceOS = $mobileDevice.DeviceOS
          DeviceTelephoneNumber = $mobileDevice.DeviceTelephoneNumber
          DeviceType = $mobileDevice.DeviceType
          FirstSyncTime = $mobileDevice.FirstSyncTime
          UserDisplayName = $mobileDevice.UserDisplayName
          }
          $results += New-Object psobject -Property $properties
      }
}

$results | Select-Object Name,UPN,FriendlyName,DisplayName,ClientType,ClientVersion,DeviceId,DeviceMobileOperator,DeviceModel,DeviceOS,DeviceTelephoneNumber,DeviceType,FirstSyncTime,UserDisplayName | Export-Csv -notypeinformation -Path $csv

Remove-PSSession $session

After that you will see the output file location in C:\TEMP\MobileDevices.csv.
Best Regards,
Phone Myint Myat Zaw
09/07/2020
10:12PM

Sunday, 5 July 2020

Azure Storage


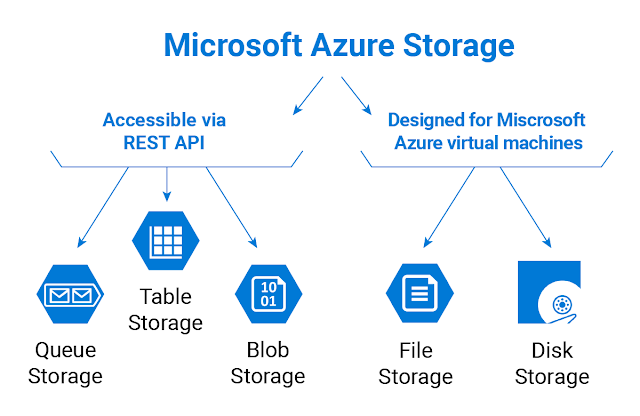
ခေါင်းစဉ်ကအတိုင်းMicrosoft azure storage အပိုင်း ဆိုပေမယ့်လည်းstorage accountနဲ့ပက်သက်တာတွေကိုပိုပြီးဆွေးနွေးပေးသွားပါမယ် Storage အပိုင်းကိုတော့ generalလောက်ဘဲဆွေးနွေးပေးသွားပါတယ်ကျွန်တော်တို့ကAzure cloudမှာ virtual machines တွေဆောက်တယ် applicationတွေrun တယ်အဲဒီapplicationတွေ VM တွေရဲ့ data storageတွေကိုazure cloudပေါမှာထိန်းသိမ်းထားနိုင်ဖို့အတွက်microsoftကstorage အမျိုးအစားများစွာနဲ့ထောက်ပံ့ပေးထားပါတယ်အဓိက storage အမျိုးအစားတွေကိုပြောရမယ်ဆိုရင်Azure SQL Server,Azure Cosmos DB နဲ့ Azure Table Storageတို့ဘဲဖြစ်ပါတယ် တစ်ခြား Storageအမျိုးအစားတွေဖြစ်တဲ့Azure Queue နဲ့ event hubs တို့လို messages တွေကိုsend and storeလုပ်ဖို့လည်းသံုးစွဲနိုင်ပါတယ် Azure Storage မှာသံုးနိုင်တဲ့ Data servicesတွေကတော့ Azure Blobs, Azure Files, Azure Queues နဲ့Azure Tables တို့ပဲဖြစ်ပါတယ် အဲဒါနဲ့ပက်သက်တဲ့တစ်ခုချင်းကိုတော့နောက်ပိုင်းမှဘဲtheoryသီးသန့်ဆွေးနွေးသွားပေးပါတယ် အခုက Azure storage account တစ်ခုကိုcreateလုပ်တော့မယ်ဆိုရင်ဘယ်လိုတွေလုပ်ရမှာလဲပြီးတော့storage account တစ်ခုပြုလုပ်တော့မယ်ဆိုရင်သူ့မှာရနိုင်တဲ့ Features တွေအကြောင်းအသေးစိပ်ဆွေးနွေးပေးသွားပါမယ် Microsoft Azure Storage Accountက Azure Storageမှာရနိုင်တဲ့Data services တွေကိုစုပေးထားတဲ့containerတစ်ခုလို့လည်းဆိုနိုင်ပါတယ် ဥပမာအားဖြင့်ပြောရမယ်ဆိုရင် storage account တစ်ခုမှာ Azure Blobs လည်းပါနိုင်သလို Azure files, Azure tables တွေလည်းပါနိုင်ပါတယ် အဲလို storage account တစ်ခုထဲမှာ data services တွေကိုစုပေးထားတဲ့အတွက်ကြောင့်data services တွေကိုတစ်နေရာထဲကနေmanage လုပ်နိုင်ပါတယ် တစ်ခြားData services တွေဖြစ်တဲ့ Azure SQL နဲ့ Azure Cosmos DB တွေကိုတော့independent Azure resourcesတွေအနေနဲ့manageလုပ်ရတဲ့အတွက်ကြောင့်storage accountထဲမှာသူတို့ကိုတော့ပေါင်းထည့်ထားလို့မရပါဘူး
Storage Account တစ်ခုစတင်ဖန်တီးတော့မယ်ဆိုရင် subscription, storage account name နဲ့ ကိုယ့်storage account ကိုထားမယ့် data center location တွေရွေးချယ်ပေးရမှာဖြစ်ပါတယ် တစ်ခြားOption တွေဖြစ်တဲ့ performance, account kinds, replications နဲ့ access tier ပိုင်းဆက်လက်ဆွေးနွေးပေးသွားပါမယ်
Performance မှာက Standard နဲ့ premium ဆိုပြီးနှစ်မျိုးရှိပါတယ် အဲနှစ်ခုဘာကွာသလဲဆိုတော့ standard ကိုရွေးချယ်မယ်ဆိုရင်တော့ကိုယ်သံုးနဲ့data services တွေဖြစ်တဲ့ (blobs, files, queue နဲ့tables) ရဲ့data တွေကိုသိမ်းဆည်းတဲ့အခါမှာ ရိုးရိုးmagnetic disk drive တွေမှာသိမ်းဆည်းပေးမှာဘဲဖြစ်ပါတယ် Premium ကိုသံုးမယ်ဆိုရင်တော့ တစ်ခြားAdditional services တွေကိုပါသံုးစွဲနိုင်တယ်
ဥပမာunstructured object data တွေဖြစ်တဲ့Block blobsတွေ append blobsတွေကိုလည်း storeလုပ်နိုင်ပါတယ် တစ်ခြားSpecialized file storage တွေ premium file share တွေကိုလည်းcreate လုပ်နိုင်ပါတယ်
အဲ လိုpremium optionကို ရွေးချယ်အသံုးပြုမယ်ဆိုရင်တော့ SSD Drive တွေနဲ့data တွေကိုMicrosoft ကသိမ်းဆည်းပေးပါတယ်
Replication က natural disaster ကြောင့်ဖြစ်စေ ကိုယ့်ရဲ့storage accountသိမ်းထားတဲ့data center ထဲက hardware failure မှုကြောင့်ဖြစ်စေကိုယ့်data တွေကိုမပျောက်ပျက်သွားအောင်data တွေက်ုတစ်ခြားတစ်နေရာမှာပွါးပြီးသိမ်းဆည်းပေးထားတာပဲဖြစ်တယ် Azure က မိမိstorage account မှာရှိတဲ့dataတွေကိုသက်ဆိုင်ရာ data center တွေမှာ default အနေနဲ့  copy ကို၃နေရာပွါးပြီးထိန်းသိမ်းပေးထားပါတယ်အဲလိုလုပ်ခြင်းကို Azure storage replication အမျိုးအစားတွေထဲကတစ်ခုဖြစ်တဲ့Locally redundant storage (LRS)လို့ခေါပါတယ် တစ်ခြား replication type တွေဖြစ်တဲ့ GRS (geo redundant storage) ကတော့regional outages တွေကိုကြောင့်data တွေဆံုးရှုံးမှုတွေကိုကာကွယ်ဖို့သံုးနိုင်ပါတယ် သူက primary regionထဲမှာပဲ data တွေကိုcopy ၃နေရာခွဲကူးပေးပြီး အဲဒီdata တွေကိုsecondary region တွေဆီကို synchronize ပြန်လုပ်ပြီး မိမိရဲ့data တွေကိုသိမ်းဆည်းပေးပါတယ်
Access Tier ရဲ့လုပ်ဆောင်ချက်တွေကတော့ကိုယ့်storage account ထဲမှာရှိတဲ့blobထဲကdataတွေကိုဘယ်လိုမြန်မြန်ဆန်ဆန်နဲ့Accessလှမ်းလုပ်နိုင်မလဲဆိုပြီးဆံုးဖြတ်ပေးပါတယ် Access tier အမျိုးအစားကိုတော့ COOL နဲ့HOT ဆိုပြီးရွေးချယ်နိုင်ပါတယ် Access Tier မှာ coolကိုရွေးချယ်မယ်ဆိုရင် data access rate က hot ထက်ဆိုရင်တော့နှေးလိမ့်မယ် ဒါပေမယ့် cost ကတော့ သက်သာစေပါတယ် Hot ကတော့ data access rate ကမြန်ဆန်စေပြီး costကပိုများတာကိုတွေ့နိုင်ပါတယ်
Account Kinds - Storage account တစ်ခုCreate လုပ်တော့မယ်ဆိုရင်ဘယ်အမျိုးအစားကိုသံုးပါမယ်ဆိုပြီးရွေးချယ်ပေးရပါမယ် Account kinds တွေကတော့ Storage V2(General Purpose V2), Storage V1(General purpose v1) နဲ့ blob storage တို့ဘဲဖြစ်ပါတယ်
General Purpose V2 Account က basic accountအမျိုးအစားဖြစ်ပြီး blobs,queues,filesနဲ့tablesတွေအတွက်သံုးနိုင်ပါတယ်
General Purpose v1 Account က legacy account အမျိုးအစားဖြစ်ပြီးသူလည်းပဲgeneral purpose v1 account လိုပဲသံုးနိုင်ပါတယ်ဖြစ်နိုင်ရင်ရင်တော့V2အစားV1ကိုသံုးစွဲစေချင်ပါတယ် မိမိကv1နဲ့blob storage account typeတွေသံုးထားတယ်ဆိုရင်တောင် v2 accountကိုdown time မရှိဘဲ data ကိုcopyကူးထားစရာမလိုဘဲတိုက်ရိုက်upgradeလုပ်ပြီးသံုးနိုင်ပါတယ်
Blob Storage account ကunstructured object data တွေကို block blob ဒါမှမဟုတ်append blobတွေအနေနဲ့သိမ်းချင်ရင်သံုးနိုင်တဲ့Special storage accountအမျိုးအစားဘဲဖြစ်ပါတယ် general purpose account နဲ့ blob storage accoutနဲ့နှိုင်းယှဉ်မယ်ဆိုရင်တော့Blob storage က latency consistent ဖြစ်ပြီး transaction rate ကပိုပြီးhigher ြဖစ်ပါတယ်
ကျန်တဲ့အပိုင်းတွေကိုတော့ storage part 2 အနေနဲ့ဆွေးနွေးပေးသွားမှာဘဲဖြစ်ပါတယ်
Author by 
Phone Myint Myat Zaw
05.07.2020
4:31PM